
Do you spend a lot of time managing your emails? Sorting messages, downloading attachments, drafting replies, and constantly checking for important emails. These tasks look small, but can take up hours out of your workflow!
What if you could automate them for free? In this article, I’ll show you 4 Useful Email automations you can build with Make.com to organize emails, generate AI replies, save attachments, and get important email alerts. So, without further ado, let’s dive right in!
Make.com Email Automations (Overview Table)
| Automation | What It Does | Setup Time | Best For |
| AI Email Categorization | Automatically labels emails into Banking, OTP, Orders, Promotions, and more | ~25 mins | Busy inboxes |
| AI Reply Drafts | Creates personalized reply drafts using OpenAI | ~20 mins | Freelancers, agencies, businesses |
| Auto Save Attachments | Saves email attachments directly to Google Drive | ~20 mins | Teams handling invoices, PDFs, and documents |
| Telegram Alerts | Sends Telegram notifications for important emails | ~15 mins | Business owners, managers, recruiters |
What is Make.com?
Make.com (formerly known as Integromat) is a visual automation platform that lets you connect multiple apps and build integrated workflows without writing code. It was founded by Patrik Šimek in 2012 and is used by over 400k+ businesses in 200+ countries.

Starting with Make.com is easy. Just drag and connect different modules on the canvas to create a workflow. Then, turn it on and set a schedule. The automation will keep running on its own! You can connect multiple apps with it, like Gmail, OpenAI, Google Drive, Telegram, etc.
There is a wide range of use cases for Make.com, including marketing and sales, lead management, email automation, social media scheduling, billing and invoicing, HR onboarding, and more.
What Do You Need to Build Email Automations with Make.com?
Before starting with Make.com, you need to understand the following concepts that will be repeated throughout this guide.
- Trigger: It’s the first event (module) that starts the workflow.
- Scenario: A complete automated workflow with multiple steps.
- Module: An individual task step that performs a specific action.
- Router: It splits the workflow into different branches using filters and rules.

In addition to these, here are the things you will require for building these automations:
- A Gmail account (Personal Gmail or Google Workspace)
- A free Make.com account
- An OpenAI API key (for AI Email Categorization and AI Reply Drafts)
- A Google Drive account ( for Attachment Saving)
- A Telegram account (for Telegram Alerts)
Note: The free plan of Make.com offers 1000 monthly AI credits, access to 3k+ apps, and lets you create up to 2 active scenarios. These are sufficient for testing these automations.
One thing worth clearing up: the OpenAI API key is billed separately and has nothing to do with a ChatGPT subscription you may already pay for. If you want cheaper access to ChatGPT itself in India, here is how to get ChatGPT Go free for a year.
Now, let us dive right into the process of creating email automations with Make.com. I have shared 4 of the most useful Gmail automations with Make.com along with a step-by-step guide for you to follow.
Automation 1: AI Email Categorization
Is your inbox overloaded with tons of banking emails, OTPs, order receipts, newsletters, and promotional emails? Well, this email automation will quickly categorize every new email into the right Gmail label so your inbox stays clean and organized.
Here’s how the automation works.
How This Automation Works
New Email
↓
OpenAI Classifies
↓
Router
↓
Apply Gmail Label
Follow the steps below to set it up.
Step 1: Create Gmail Labels
Before starting with the automation part, you need to create relevant labels within Gmail for categorizing your emails. To do this, open the Gmail app and click on the Settings icon in the top-right corner. Then go to:
See all Settings → Labels → Create new label

Create the following five labels:
- Banking
- OTP
- Promotions
- Orders
- Other
Step 2: Create a New Scenario
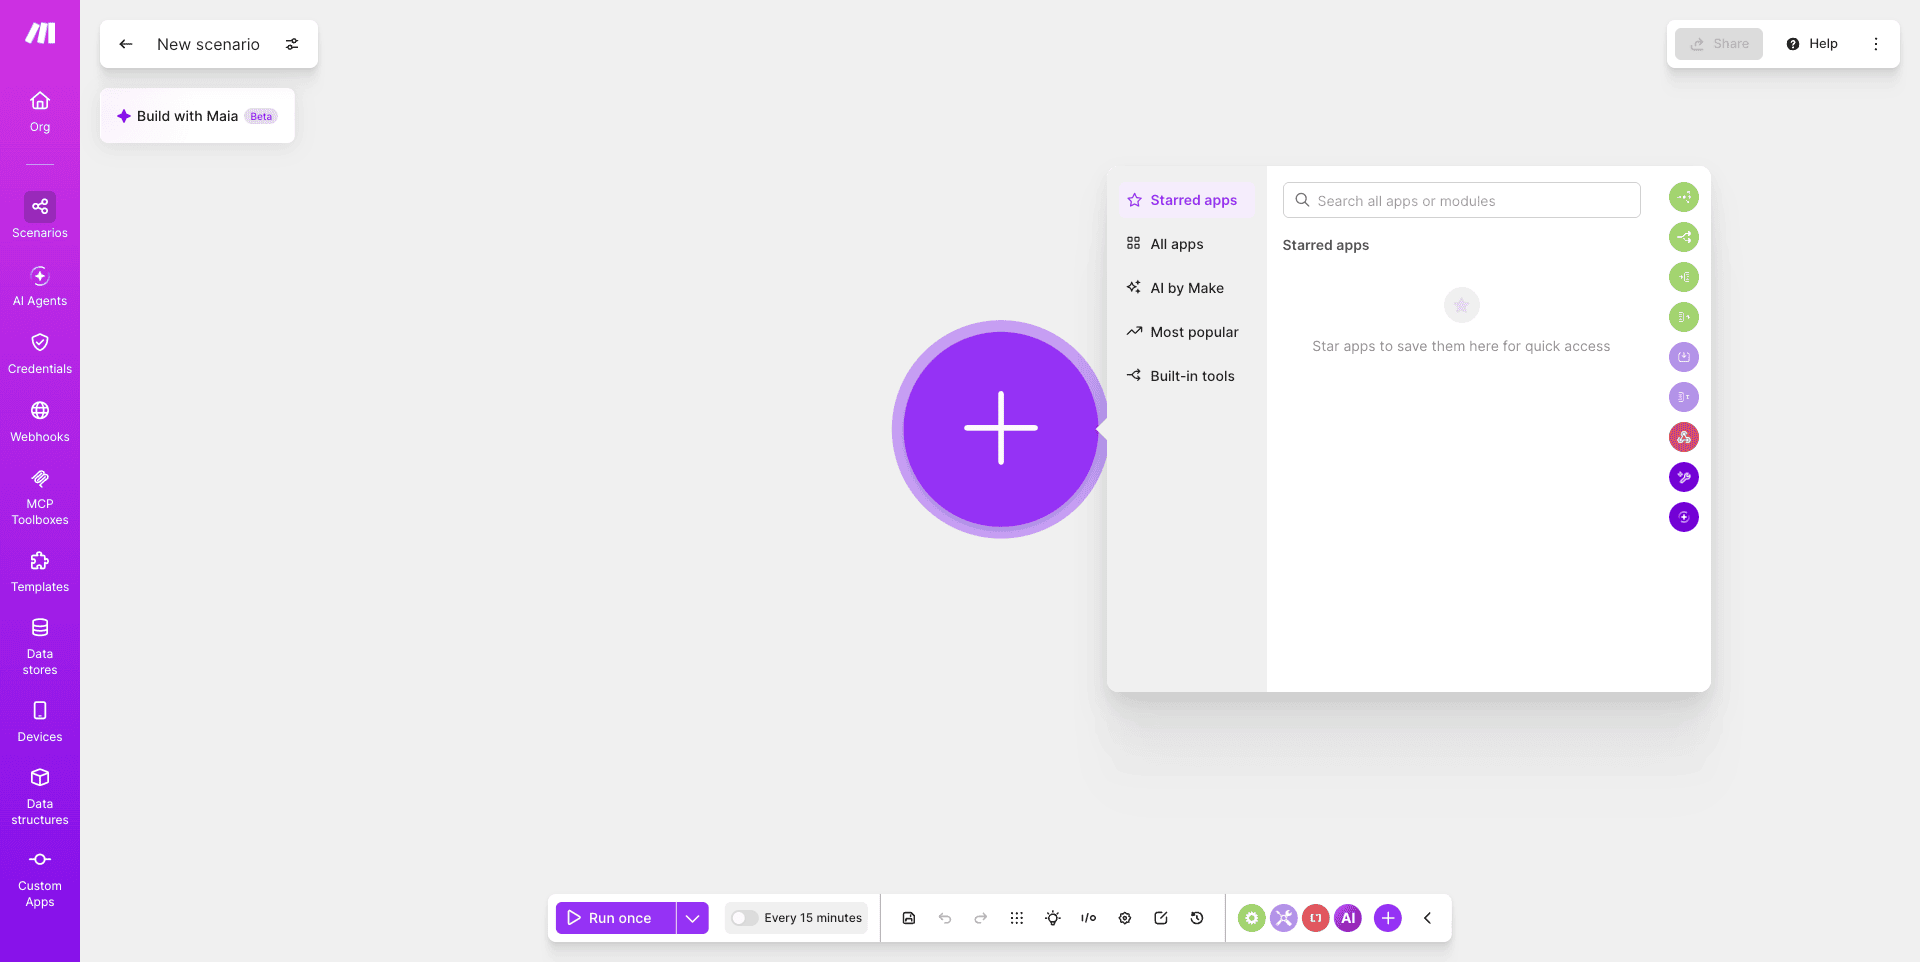
Next, log in to your Make.com account and go to “Scenarios” from the left menu. Click on ‘Create Scenario’. This will open up a blank canvas.
Step 3: Add Gmail Watch Emails Module
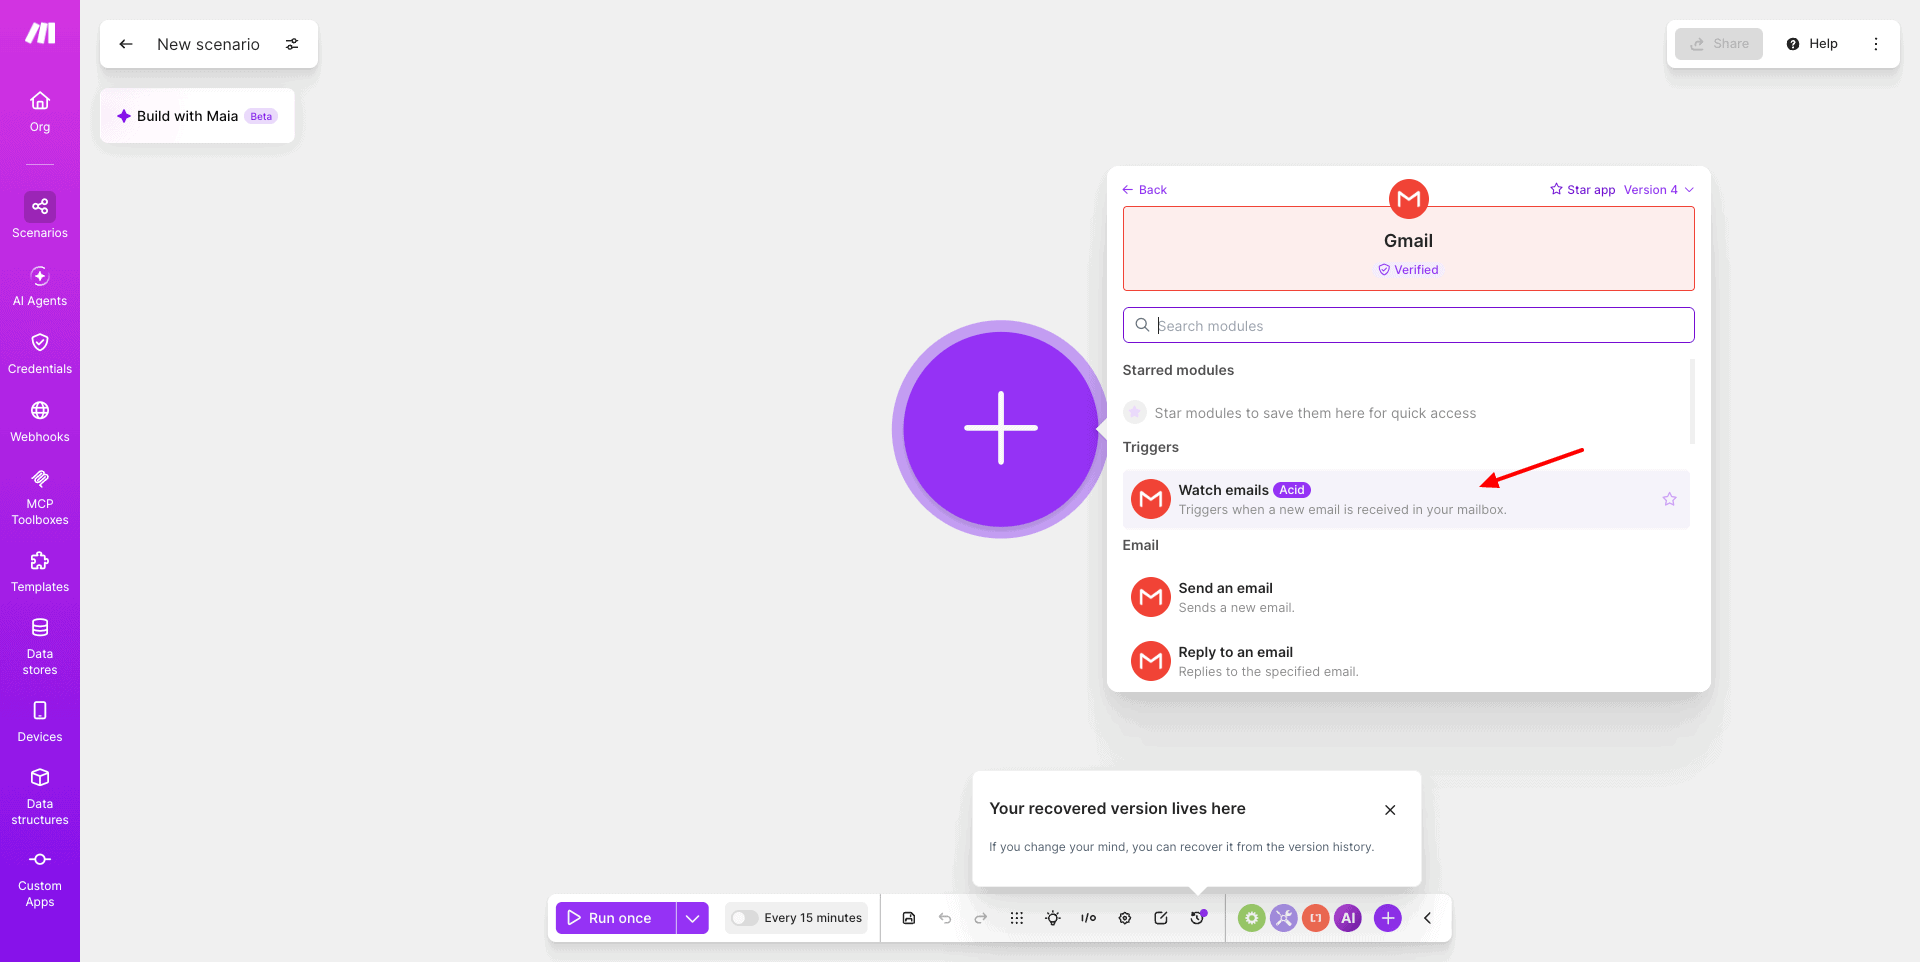
Now, hit the ‘+’ icon on the canvas and search for Gmail. Select the ‘Watch Emails’ module from the available ones. Next, you will be asked to add your Gmail account and authorize it.
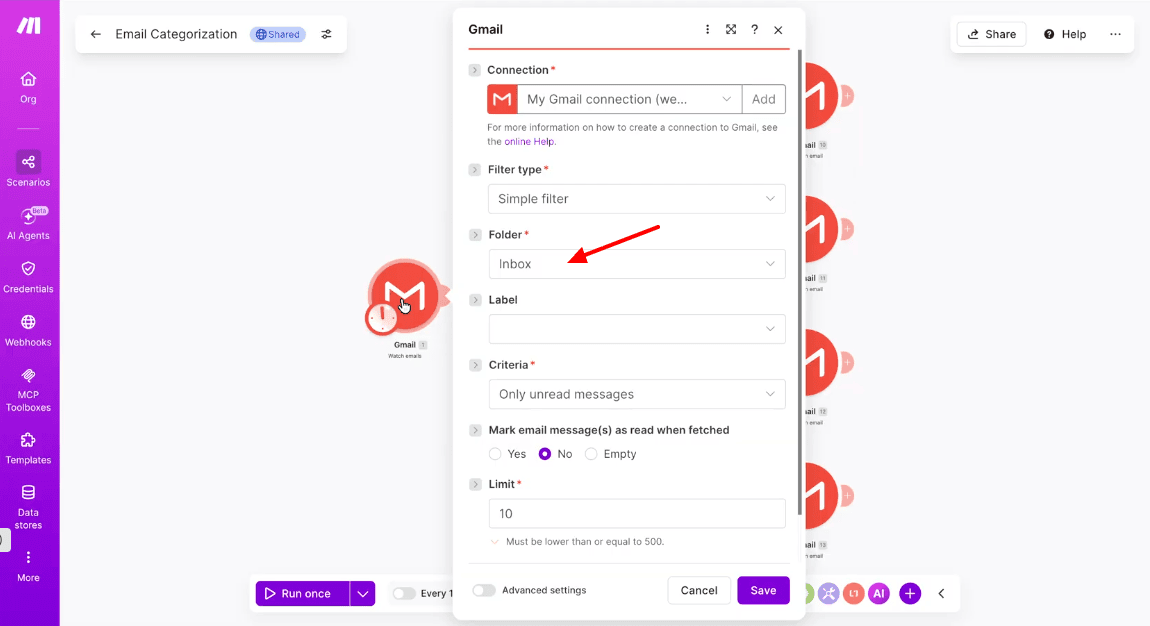
Once that is done, select Folder: “Inbox” and hit the ‘Save’ button. Now, this module will act as a trigger. It will start the automation whenever a new email arrives in your inbox.
Step 4: Connect OpenAI and Enter Prompt
Moving on, we will click on the + icon next to the Gmail module and search for OpenAI. Select ‘Simple Text Prompt’ and set the model to GPT 4 or GPT 4.5. Now, open the OpenAI module and paste the following prompt, and click on ‘Save’.
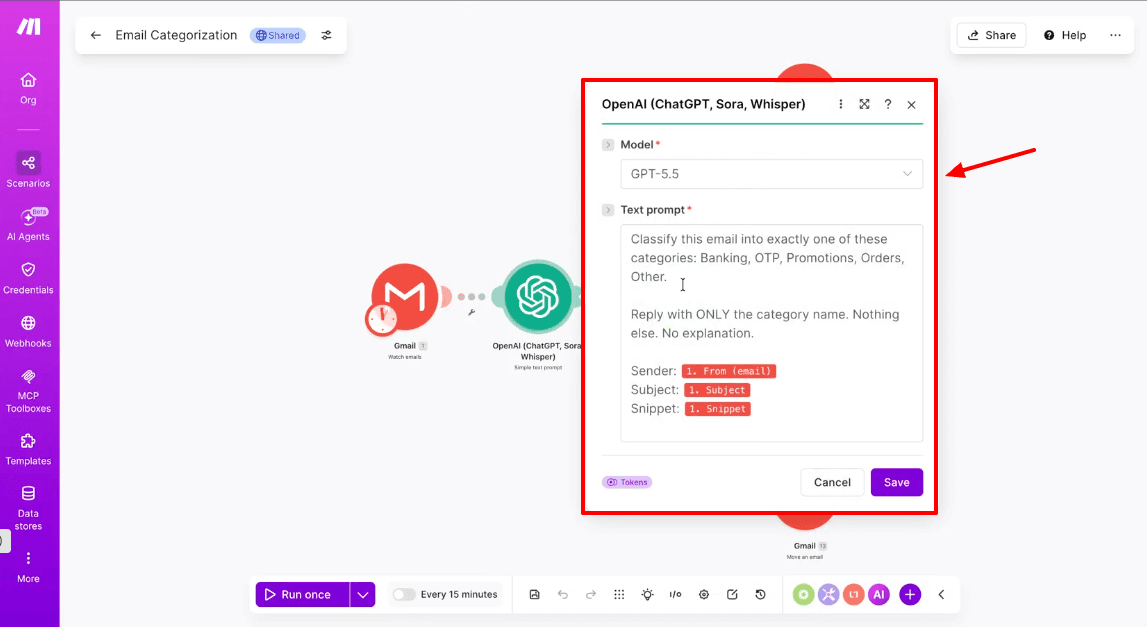
Copy This Prompt
Classify this email into exactly one of these categories: Banking, OTP, Promotions, Orders, Other.
Reply with ONLY the category name. Nothing else. No explanation.
Sender: {{1.fromEmail}}
Subject: {{1.subject}}
Snippet: {{1.snippet}}
Note: Don’t forget to instruct OpenAI to return only the category name. Without this instruction, it may return extra text that the next step won’t recognize due to case sensitivity.
Step 5: Add the Router for Multiple Paths
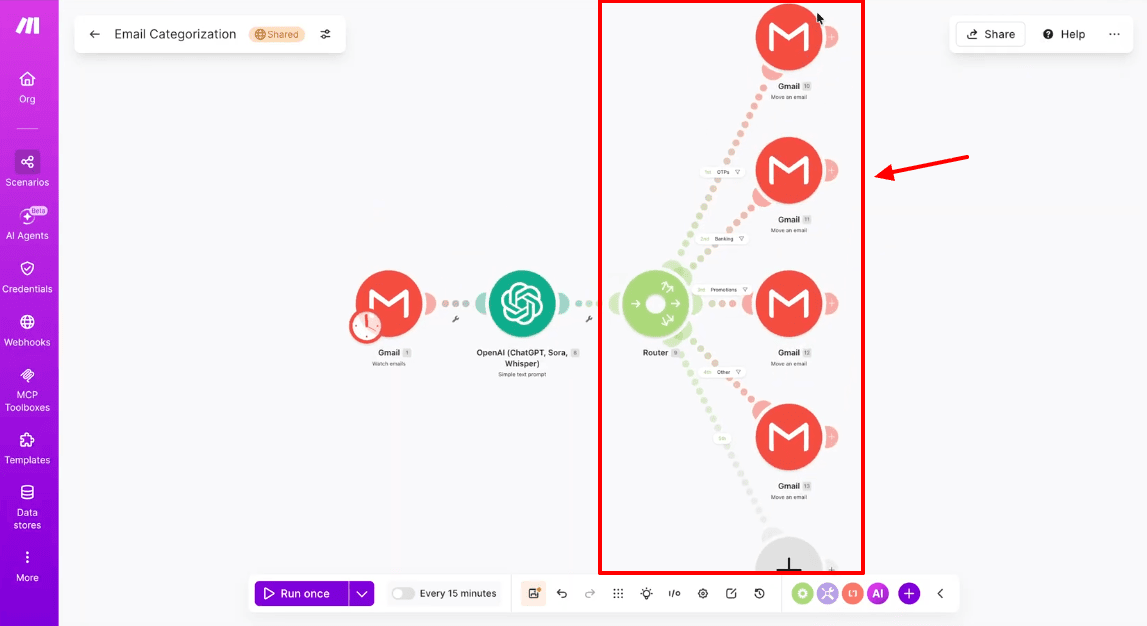
Further, click on the ‘+’ icon next to the OpenAI module and search for the ‘Router’ module. Now, create 5 different paths for: OTP, Banking, Promotions, Orders, Other. Finally, click on ‘Save’.
Step 6: Configure the Router
Now, we will configure each path and add a filter to it as follows. For instance, here’s how you need to configure the ‘OTP’ Path.
- Click on the OTP path.
- Fill in these fields:
- Message ID: 1. Message ID
- Source Folder: System folders: Inbox
- Destination Folder: User labels: OTPs
- Click on “Save”.

Next, follow the below steps to configure the filter.
- Click the filter between the OTP path and Router.
- Under Conditions, select “Result”.
- Select Text Operator: “Equal To”.
- In the value box, type: “OTP”.
- Click on “Save”.
Repeat the same for all the other paths.
Step 7: Set the Run Interval
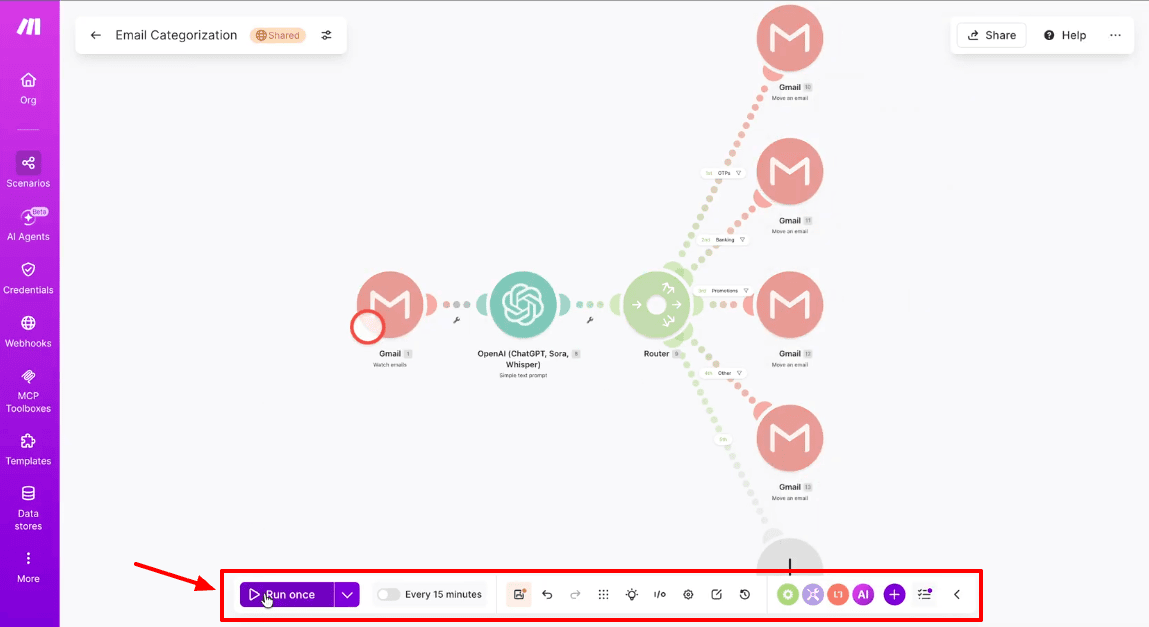
Before enabling your automation, test it first. Click on “Run Once” and select the run interval as “Run every 15 minutes”. Your emails will now be automatically categorized and moved to their respective labels. That’s it. Your Gmail Organizer is now ready!
Automation 2: AI Auto-Reply Drafts
Constantly replying to support queries, business emails, and inquiries can take up much of your day. What if AI could read your business emails and automatically draft a professional email for you? This automation does exactly that! Here’s how it works.
How This Automation Works
New Email
↓
OpenAI Generates Reply
↓
Create Gmail Draft
Now let’s look at the steps to automate this.
Step 1: Create New Scenario & Add Gmail Watch
We will start with a new scenario and add a Gmail Watch Emails module to it, as we did in the first automation (Step 2 & 3).
Step 2: Add OpenAI Auto Reply Prompt
Next, click on the ‘+’ icon next to Gmail and search for ‘OpenAI’. Select the “Simple Text Prompt” and set the model to “GPT-4” or “GPT-4.5”. Finally, paste the following prompt and click ‘Save’.
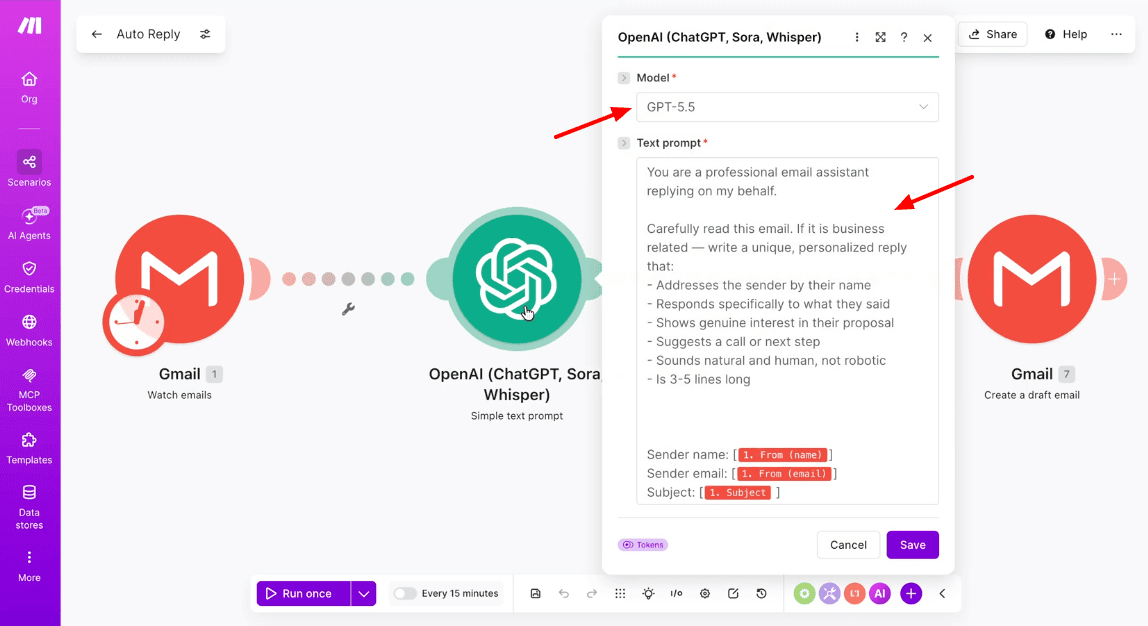
Copy This Prompt
You are a professional email assistant replying on my behalf.
Carefully read this email. If it is business related, write a unique, personalized reply that:
– Addresses the sender by their name
– Responds specifically to what they said
– Shows genuine interest in their proposal
– Suggests a call or next step
– Sounds natural and human, not robotic
– Is 3-5 lines long
Sender name: [{{1.fromName}}]
Sender email: [{{1.fromEmail}}]
Subject: [{{1.subject}}]
Full email: [{{1.fullTextBody}}]
Note: If the generated replies sound generic, you can refine the prompt by specifying your voice, style, etc. This will improve the quality of the output. The same prompt tuning idea works when you write a professional resume with AI.
Step 3: Create Draft Email
Again, click on the ‘+’ icon next to OpenAI and search for “Create a draft email”. Fill in the following fields:
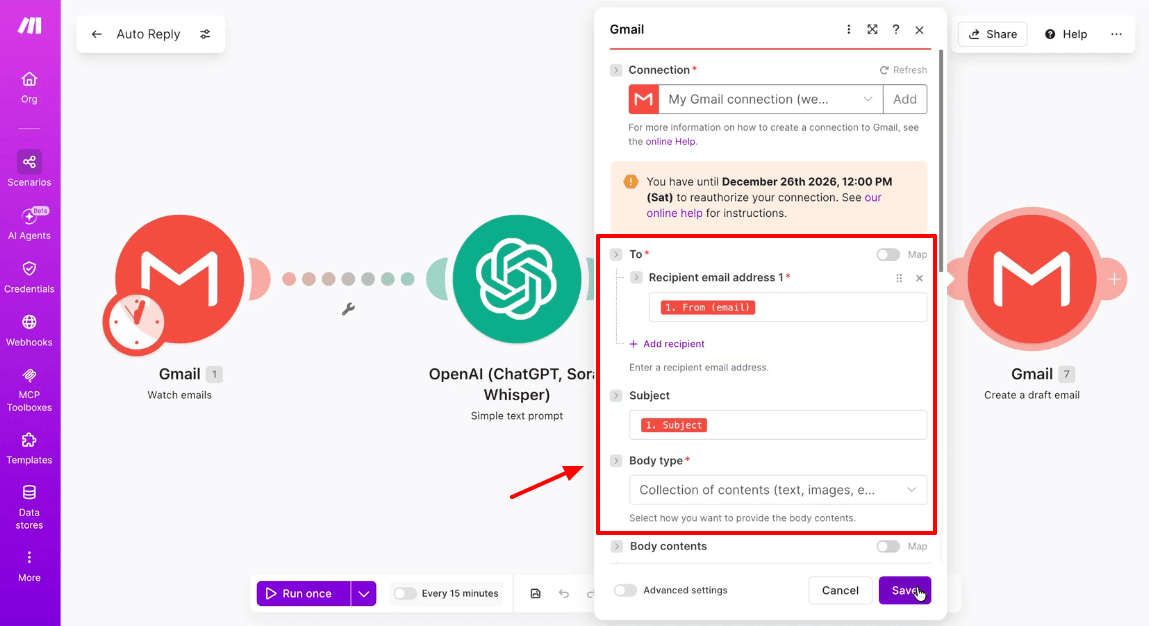
- To → Recipient Email Address: Select “From (Email)”
- Subject: Select “Subject”
- Body Contents → Content 1 → Text: Select “Result” (from OpenAI)
Finally, click on the “Save” button.
Step 4: Activate the Automation
Click on ‘Run Once’ to test the automation and select “Run every 15 minutes” within the run interval. The draft replies will appear in your Gmail drafts folder to review.
Note: This automation creates email drafts and doesn’t automatically send them. You need to manually review and send them for safety.
Automation 3: Save Email Attachments to Google Drive
If you receive hundreds of emails with invoices, receipts, PDFs, bank statements, reports, this automation is for you! It automatically downloads your email attachments and saves them into designated Google Drive folders. Here’s how it works.
How This Automation Works
New Email
↓
Extract Attachment
↓
Upload to Google Drive
Now let’s get into the steps to automate this process.
Step 1: Create New Scenario & Add Gmail Watch
Repeat the steps from the previous automation to create a new scenario and add the Gmail Watch Emails module.
Step 2: Extract Email Attachments

Now, click on the ‘+’ icon next to Gmail and search for “List Email Attachments and Media”. Within Message ID, select “Message ID” and click on the ‘Save’ button. This step extracts email attachments from your incoming emails.
Step 3: Create Google Drive Folder
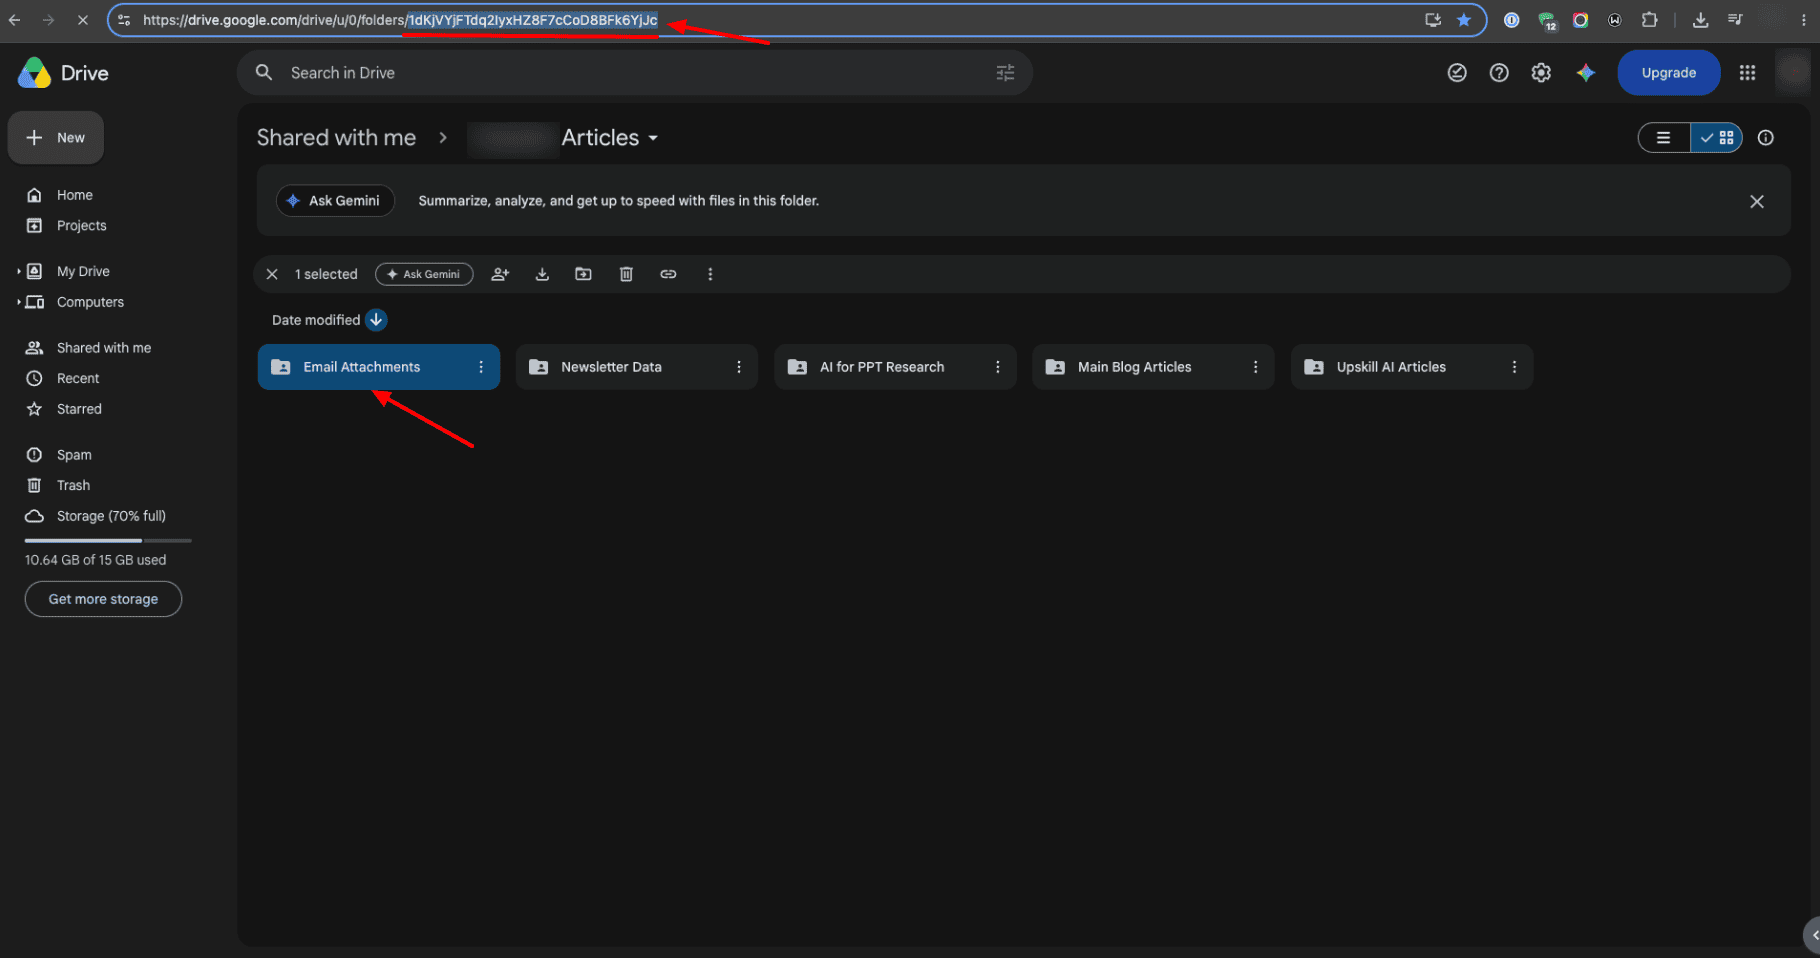
Next, create a new folder named ‘Email Attachments’ within Google Drive. Copy the folder ID from the URL (the long string after /folders/).
Step 4: Upload to Google Drive
Now, head back to Make.com and click on the ‘+’ icon. Search for “Google Drive” and select the “Upload a File” option. Now fill in the following details and click ‘Save’.

- Folder ID: Paste your Email Attachments folder ID.
- File Name: Map “3. Filename from Gmail 3”.
- Data: Map “3. Data from Gmail 3.”
Step 5: Activate Automation
Finally, click “Run Once” to test your automation. Set the run interval to “Run every 15 minutes”. Now, all your email attachments will be automatically saved to your Google Drive folder.
Note: If you don’t use Gmail, you can use the Email → Watch Emails module instead. Create a new connection, select IMAP as the Connection Type, and enter your email provider’s IMAP settings along with the required connection details.
How to Configure this Automation for Personal Gmail?
If you are using your personal Gmail instead of Google Workspace, you need to perform a one-time OAuth setup so Make.com can upload attachments to your Google Drive. Here are the steps you need to follow.
- Open Google Cloud Console and create a new project.
- Enable the Google Drive API.
- Configure the OAuth Consent Screen.
- Create OAuth Client Credentials.
- Copy the Client ID and Client Secret.
- While connecting Google Drive in Make.com, enable Advanced Settings and paste these credentials.
Automation 4: Get Telegram Alerts for Important Emails
When your inbox is flooded with emails, it’s easy to miss out on the important ones. But not anymore! This automation sifts through all your emails and sends you Telegram alerts for the ones that are from important contacts like your boss, clients, manager, etc. Here’s how it works.
How This Automation Works
New Email
↓
Filter Important Senders
↓
Telegram Notification
Now let’s get into the steps for automating this.
Step 1: Set Up Telegram Bot
First, we will open the Telegram app and search for “@BotFather”. Click on “Start” and type “/newbot”. Now, give your bot a name, like “My Email Alerts”. Give it a unique username, for instance, “myemailalerts_bot”.

BotFather will return a Bot Token. You need to copy and save it securely. Then, search for your new bot in Telegram and click “Start”. Send a random message like “Hi”.
Step 2: Get Your Telegram Chat ID

Next, open Telegram and search for “@userinfobot”. Then click on “Start”. It will display your Chat ID. Copy and save it for later.
Step 3: Create New Make.com Scenario & Add Gmail Watch
Now, go to Make.com. Just like the previous automations, create a new scenario and add a Gmail Watch Emails module. Then fill in the following details:

- Connection: Your Gmail account
- Folder: Inbox
- Criteria: Unread only
- Limit: 5
Finally, click on the “Save” option.
Step 4: Add Filter for Important Senders
Click the circle next to the Gmail module and select the funnel icon (Filter). Now fill in the following details.

- Label: Important Sender
- Field: 1. From (email)
- Operator: Contains (Case Insensitive)
- Value: Your boss/client email (e.g., boss@company.com)
Click “Add OR rule” to add more important people and click “Save”.
Step 5: Add Telegram Bot & Configure Message Content
Now, click “+” on the canvas and search for “Telegram Bot”. Select “Send a Text Message” and click the “Add” button next to Connection. Provide the details and click “Save”.
- Connection name: My Telegram Bot
- Bot Token: [ Paste the bot token from BotFather ]
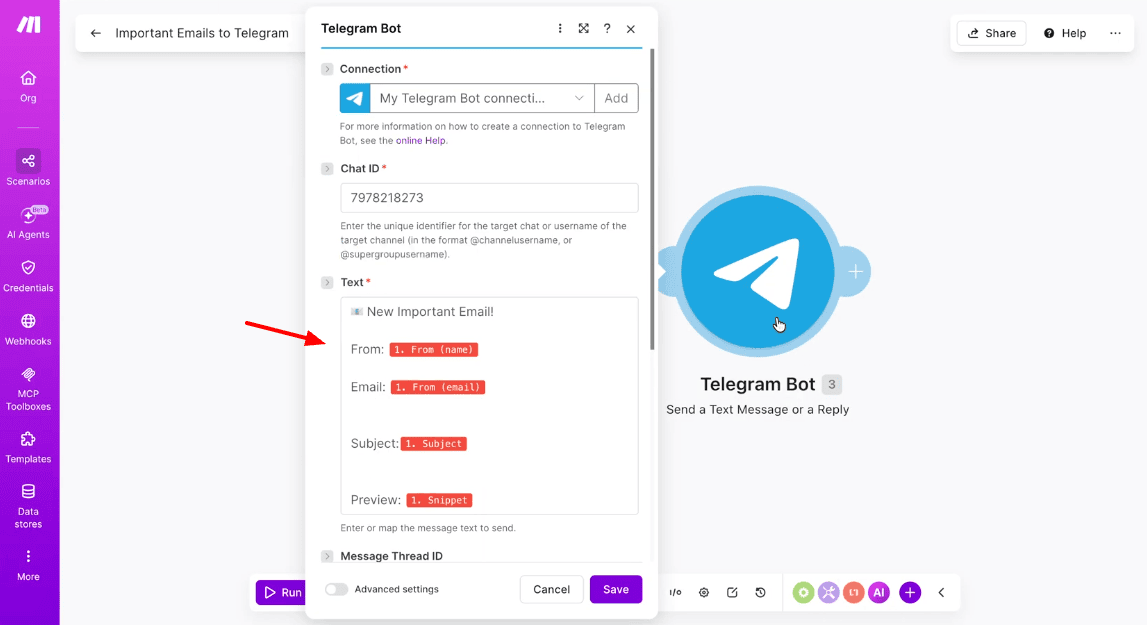
Next, for configuring message content, fill the following details in the Telegram module:
- Chat ID: Paste your Chat ID from Step 2
- Text: Click the field and type:
Copy This Message Template
📧 New Important Email!
From: [map 1. From (name)]
Email: [map 1. From (email)]
Subject: [map 1. Subject]
Preview: [map 1. Snippet]
Time: [map 1. Date]
Map each field from the Gmail module (click and select from dropdown) and click “Save”.
Step 6: Activate Automation

Finally, click “Run Once” to test. You will receive a Telegram notification for each important email. Set it to run continuously for real-time alerts. And this is how you can get telegram alerts for your important emails!
Make.com Free vs Paid Plans
The free plan of Make.com features 1,000 credits per month, 2 active scenarios, and 3k+ app integrations, as listed on Make.com’s pricing page. This suffices for light testing. You get a full visual scenario builder, access to Make AI Agents & Module tools, and 90-day expert access and Make Academy training.

If you want to upgrade, the paid plans of Make.com start from $9/month, where you get 5k monthly credits with unlimited active scenarios. This plan is suitable for professionals and small and medium-sized businesses. On the paid plans, unused credits roll over to the next month.
What are the Best Use Cases of Make.com?
The following table depicts the key real-life use cases of Make.com.
| User Group | Use Cases |
| Freelancers & Solo Professionals | Automate invoice follow-ups, client onboarding emails, lead capture from contact forms, and project status updates. |
| Marketing Teams | Lead capture into CRM systems, social media content distribution with scheduled publishing, & invoice generation triggered by project completion. |
| Operations & RevOps Teams | Sync customer data between Salesforce and HubSpot, trigger Slack alerts on CRM stage changes, & update spreadsheets from form submissions. |
| Customer Support Teams | Route support tickets by sentiment, urgency, or keyword, auto-reply to common queries, log all conversations to a central sheet, escalate urgent tickets to Slack in real time. |
| E-Commerce & D2C Brands | Trigger order confirmation emails from Shopify, sync inventory to Google Sheets, alert on Slack when stock drops below threshold, and log customer data into CRM |
Conclusion
In this article, we learned how to build useful email automations with Make.com to organize your emails, draft AI replies, save your attachments, and get important email alerts. I hope the step-by-step instructions helped you follow the process with ease.
If you want more AI in your daily workflow, here is how to use ChatGPT on WhatsApp for free, and a set of ready-made prompts to prepare for an interview using AI. On the creative side, you can also use Google Omni Flash for free to make AI videos.
Anyway, have you used Make.com? What automations have you built with it so far? Do share in the comments below. I’ll be back with more insightful content soon. Cheers, and keep learning!


